A Christina Inspired Chair…
19May 30, 2016 by Terry
Let me tell you about Christina…
Christina is one of my favourite long time customers. She has been a huge supporter of my work and has always lifted me high with her trust and admiration for the work I do.
She has had me do projects for her where she has said “whatever you do to this I will love!” … and she really does! There is no higher compliment than when someone says I love your taste and do whatever you like with this. It is also a lot of pressure. I always want to please. NEVER has she given me anything but praise for the work I’ve done for her and she is always un phased by the price I quote her as well. She is a true supporter and I so appreciate her!
(To see some of the pieces I have done for her click HERE and HERE)
Last week I learned that Christina’s husband has been transferred back to NewBrunswick and that they would be moving very soon. Ugh! I was saddened by this news. Her friend had called and asked me if I had anything that she could purchase to give her as a going away gift. At the time all I had were large pieces that obviously wouldn’t be easy to move across the country. This friend had previously purchased a coat rack I had created and knew that Christina loved it so she decided that she would part with it and give it to her as a gift. What a great friend she is to her!
A bit of a backstory…
Last week a good friend of mine took me on a shopping trip to Calgary for the day. She took me to so many inspiring places and I had so many new ideas now running through my mind.
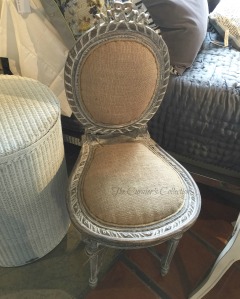
One of the pieces I had seen that spoke to me was this little chair with burlap. It had a unique shaped seat and was filled with character.
I knew I had chairs at home that I could apply at least part of this look to and I could hardly wait to get started on creating my own take on it.
Then it hit me … THIS could be Christina’s Chair! I called her friend and let her know that I had found something she could give her but it was too late, she had already given her the coat rack. I have to admit I felt a little deflated as this little chair all done up really said ‘Christina’. …. then came the thought that it didn’t mean she still couldn’t have it.
It would be my gift of appreciation for all that she has contributed to helping me grow my small business.
This is how the chair looked before:
Pretty as it was in it’s tattered state, it wasn’t a ‘sitable’ chair.
(Sorry I don’t have photos of this part)
I started by cutting out all the broken reed. Next I placed some newspaper on the seat and traced the shape to make a pattern for the new support I needed to create. I placed my pattern on a piece of leftover MDF and traced it onto it. Next I took my jig saw and cut it out. I went back and retro fitted the MDF on the chair and retraced the seat from underneath with a sharpie to get the exact shape and then cut again. It ended up perfect!
I added 1 inch foam to the top and cut to fit that as well. I covered that with some batting to smooth the edges of the foam and MDF. Next I upholstered the new seat with some natural coloured burlap and finished it with some herringbone hemp and upholstery tacks. I measured out the tacks to being 1 inch apart. I love this detail!
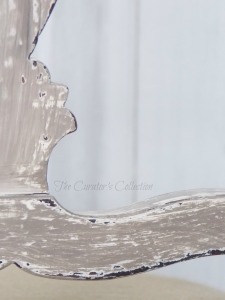
For the frame of the chair I started out by doing the usual prep work … sanding and a thorough wipe down. Next I decided that I wanted that weathered, layered look but I wanted it to look calm and neutral. I have recently discovered an new line of paint that has fast become a favourite to work with. It is called FAT PAINT (I am not being compensated in any way for this post, I just really like this paint and want to share) and I am enjoying experimenting with all the products! Let me say, it is soooo worth the drive to get it ;)
For the first layer I chose Parchment and applied 2 thin uneven coats not worrying about being perfect. When the second coat of parchment was almost completely dry I went over it with some watered down (only to thin it out a little) Bitter Chocolate. I didn’t load the brush too heavily with the chocolate colour though as I was only randomly brushing over the parchment colour and blending it in with some of the places that still had a little wet parchment. What a beautiful effect this created.
Finally, I sanded it down and gave it a generous coat of the FAT PAINT Bees wax. This is glorious stuff! It goes on like a dream and buffs to a beautiful shine afterwards with a butter smooth finish.
I also decided that I would like to place a little personal touch on the underside of this chair to make it a little special. Instead of using the usual dust cover for the underside, I decided to use burlap again but place a transfer image of a crown on it with this message…
“On the darkest days when I feel inadequate and unworthy, I remember whose daughter I am and I straighten my crown”
It’s just a small reminder for her that she is treasured.
The end result? … absolutely lovely! Simple and not overstated!
Wishing Christina all the best in this new chapter of her life!
Smiles!
Terry
Sharing this special chair at:
My Sweet Things
The Scoop
Share this:
Related
Category: Furniture Transformations, Upholstered Pieces | Tags: antique chair makeover, Beeswax finish, Bitter Chocolate FAT Paint, Burlap seat covers, Decorating ideas, FAT Paint, furniture makeovers, Home and Garden, Home Improvement, Painted furniture, Parchment FAT Paint, Upholstery


Fantastic tribute to Christina. She had just invited me to join her link party and highly complimented me on my work which no one else has done. I thank her. She must be a very special lady and with a huge heart. I hope she still keeps her blog going to be an inspiration to others. May the good Lord be with her in the new chapter of her life and keep her and her family healthy and safe.
LikeLike
Oh my goodness Terry, what a beautiful chair! I have no doubt Christina will cherish (pardon the pun) her chair. What a sweet idea leaving a special message for her on the underside. Love the paint technique you used and the herringbone hemp trim paired with the burlap. I must get to my FAT retailer (that doesn’t sound so good, does it) soon and try it out.
LikeLike
Oh thank you so much for your sweet comment! You really should try out this paint! I really like how it goes on and distressing it is such a breeze! I hope you are having a great week so far, I have been behind this week a bit on my messages … no time for technology between running around for clients ;) It’s all good though! Have a sunny weekend friend!
Smiles!
LikeLike
You did an amazing job on the chair. What a nice gesture and gift for your client. I like the “how to” tutorial. xx Kris
LikeLike
Thank you Kris! I wish I would have been able to share some pictures of the How to part but sometimes ‘in the moment’ it’s not first on my mind … definitely need to work on that for future posts ;) I hope you have a great rest of your week!
Smiles!
LikeLiked by 1 person
That I 100% understand. I do that often. :)
LikeLiked by 1 person
Oh you did it again, created a beautiful piece of furniture from a piece most of us would consider trash. I especially like the detail on the fabric underneath.
LikeLike
Thank you so much for the high compliment! I hope you have a great rest of your week!
Smiles!
LikeLike
Just a lovely makeover! Saving this to my DIY Gorgeous chairs board :)
LikeLike
Oh So Flattered! Thank you so much Tarahlynn! You made my day!
I hope you have a great weekend!
Smiles!
LikeLike
So beautiful. Thoughtful gift.
:) gwingal
LikeLike
Thank you! And thank you for taking the time to comment! I hope you have a great day!
Smiles!
LikeLike
Terry,
Absolutely breathtakingly beautiful, dear one!
Your customer Christian is correct when she stated, “whatever you do to this I will love!”
I am intrigued with the crown print and the message to the underneath side!
Precious, indeed!
You have made this piece a work of art with your artistic touch!
Fondly,
Pat
LikeLike
Oh my goodness you are sweet Pat! Thank you so much for the uplifting compliment! You made amy week!
I hope you have an amazing day!
Smiles!
LikeLike
[…] from The Curators Collection created this wonderful chair for a friend. It looks absolutely amazing and I love the new paint she […]
LikeLike
What a gorgeous and thoughtful gift, Terry. I’m sure your friend will treasure it! Especially love the message underneath. Keep shining! Cynthia
LikeLike
Thank you Cynthia! You are so sweet! I’m so happy to have given her a little something to remember by! I hope you have an amazing day!
Smiles!
LikeLike
I really love how the aged finish came out on this chair-pinning!
LikeLike
Thank you so much for your kind compliments and for the pin!
Smiles!
LikeLike